DIY Pet Photography Studio: Pro Setup Under $50
Anúncios
Create a professional-looking DIY pet photography studio for under $50 using inexpensive materials and simple techniques, perfect for capturing adorable and frame-worthy photos of your furry friends.
Want to capture stunning photos of your beloved pets without breaking the bank? Building your own DIY pet photography studio: build a professional-looking setup for under $50 is easier than you think and allows you to unleash your creativity while creating lasting memories.
Anúncios
Why Build a DIY Pet Photography Studio?
Creating a DIY pet photography studio offers numerous benefits. Firstly, it’s incredibly cost-effective compared to hiring a professional photographer for every photoshoot. Secondly, you have complete control over the environment, allowing you to create a comfortable and stress-free setting for your pet. Thirdly, it’s a fun and rewarding DIY project that lets you express your creativity.
Here’s why a DIY setup is a great idea:
Anúncios
Cost-Effectiveness
Professional pet photography can be expensive. A simple photoshoot can easily cost hundreds of dollars. By building your own studio, you invest a small amount upfront and can take unlimited photos.
Comfort and Control
Pets can be anxious in unfamiliar environments. A home studio allows them to relax, resulting in more natural and authentic photos. You can also control the lighting, background, and props to suit your pet’s personality.
Creative Freedom
A DIY studio gives you the freedom to experiment with different styles and techniques. You can try out various backdrops, lighting setups, and props to find what works best for your pet.
In summary, building your own pet photography studio is a win-win situation for both you and your furry friend.
Gathering Your Supplies
One of the best things about a DIY pet photography studio is that you can build it with readily available and inexpensive materials. Here’s a list of essential supplies you’ll need to get started, all while staying under the $50 budget.
Let’s break down the key materials:
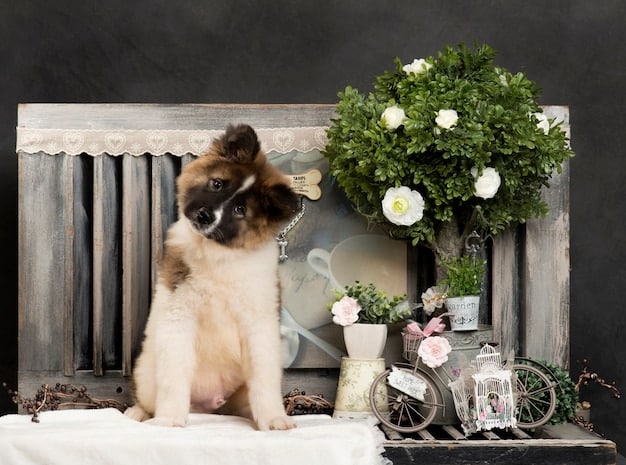
Background
A simple, clean background is crucial for professional-looking photos. Here are a few options:
- White sheet or fabric: An inexpensive and versatile option that can be easily draped or hung.
- Foam board: Provides a smooth, clean surface and can be easily found at craft stores.
- Seamless paper: Offers a professional look but may be slightly more expensive.
Lighting
Good lighting is essential for capturing clear and well-lit photos. Consider these options:
- Natural light: Position your studio near a window to utilize natural light.
- Clamp lights: Affordable and versatile, clamp lights can be easily positioned and angled.
- Softbox (DIY): Create a DIY softbox using a cardboard box, aluminum foil, and diffusion material (like a white sheet).
Props and Accessories
Props can add personality and charm to your photos. Here are some ideas:
- Pet toys: Use your pet’s favorite toys to capture their attention.
- Treats: Reward your pet with treats to keep them engaged and cooperative.
- Fabric scraps: Use colorful fabric scraps to add texture and visual interest to your photos.
By carefully selecting your supplies, you can create a professional-looking studio without exceeding your budget.
Setting Up Your Studio Space
Choosing the right space and setting it up effectively is crucial for successful pet photography. Consider the following factors when selecting your studio location, and make sure to optimize the space for the best results.
Here’s how to create the ideal environment:
Choosing the Right Location
The ideal location should have:
- Ample space: Ensure enough room for your pet to move around and for you to position your camera.
- Good lighting: Opt for a room with large windows or access to natural light.
- Minimal distractions: Choose a quiet area where your pet won’t be easily distracted.
Creating a Backdrop
Once you’ve chosen your location, it’s time to set up your backdrop:
- Hang your background: Use clamps or tape to secure your background to a wall or stand.
- Smooth out wrinkles: Ensure your background is smooth and free of wrinkles for a clean look.
- Consider the angle: Position your background to eliminate unwanted shadows.
Positioning Your Lights
Proper lighting is key:
- Utilize natural light: Position your setup near a window to maximize natural light.
- Diffuse the light: Use a DIY softbox or diffuser to soften harsh shadows.
- Experiment with angles: Try different lighting angles to find what works best for your pet.
With a well-chosen location and a carefully set up studio, you’ll be well on your way to capturing stunning pet photos.
Mastering Lighting Techniques
Lighting can make or break a photograph. Understanding how to utilize natural light and supplement it with artificial light is essential for creating professional-looking pet photos. Here are some tips for mastering lighting techniques.
Let’s dive into the details:
Understanding Natural Light
Natural light is often the most flattering light source for portraits. However, it can be unpredictable and inconsistent. Here’s how to make the most of it:
To maximize natural light usage:
- Shoot during golden hour: The hour after sunrise and the hour before sunset provide soft, warm light.
- Avoid direct sunlight: Direct sunlight can create harsh shadows and wash out colors.
- Use a diffuser: Diffuse natural light with a sheer curtain or diffuser to soften shadows.
Utilizing Artificial Light
Artificial light can be used to supplement natural light or as the primary light source. To that end:
For using artificial light effectively:
- Use clamp lights: Clamp lights are an affordable and versatile option.
- Create a DIY softbox: A DIY softbox can soften the light and reduce harsh shadows.
- Experiment with angles: Try different lighting angles to find what works best for your pet’s features.
Avoiding Common Lighting Mistakes
There are several common lighting mistakes to avoid:
- Harsh shadows: Avoid direct, unfiltered light that creates harsh shadows.
- Red eye: Prevent red eye by using diffused light and avoiding direct flash.
- Uneven lighting: Ensure your pet is evenly lit to avoid dark spots or overexposure.
With practice and experimentation, you can master lighting techniques and create stunning pet photos.
Engaging Your Pet During the Photoshoot
Keeping your pet engaged and cooperative during the photoshoot is crucial for capturing great photos. Patience, positive reinforcement, and a few tricks can go a long way in ensuring a successful and enjoyable experience for both you and your furry friend. This is what you should focus on when photographing pets.
Here’s how to keep your pet happy and engaged:
Creating a Positive Environment
To do this:
- Keep it short and sweet: Limit photoshoot sessions to 15-20 minutes to avoid overwhelming your pet.
- Be patient and encouraging: Use a calm and reassuring voice to keep your pet relaxed.
- Avoid stressful situations: If your pet becomes anxious, take a break and try again later.
Using Treats and Toys
For a pleasant experience for your pet:
Effective use of treat and toys:
- Reward good behavior: Use treats and toys to reward your pet for following commands.
- Capture their attention: Use toys to capture your pet’s attention and create dynamic poses.
- Choose high-value treats: Use treats that your pet loves to keep them motivated.
Getting Creative with Poses
Here are poses you can try and experiment with:
Try these creative poses:
- Action shots: Capture your pet playing or running for dynamic and energetic photos.
- Close-ups: Focus on your pet’s eyes or nose for intimate and expressive portraits.
- Candid moments: Capture your pet in their natural environment for authentic and heartwarming photos.
By creating a positive environment, using treats and toys, and getting creative with poses, you can capture stunning photos of your pet that truly capture their personality.
Post-Processing and Editing Tips
Post-processing and editing can enhance your pet photos and give them a professional finish. Simple adjustments to lighting, color, and sharpness can make a big difference in the overall quality of your photos. Here are some essential post-processing and editing tips to help you enhance your images.
Here’s how to polish your photos:
Basic Adjustments
These include:
- Exposure: Adjust the overall brightness of your photo.
- Contrast: Enhance the difference between light and dark areas.
- Highlights and shadows: Adjust the brightness of highlights and shadows individually.
Color Correction
These include:
- White balance: Correct any color casts by adjusting the white balance.
- Saturation: Adjust the intensity of colors.
- Vibrance: Enhance muted colors without over-saturating skin tones.
Sharpening and Noise Reduction
These include:
- Sharpening: Enhance the sharpness of details in your photo.
- Noise reduction: Reduce unwanted noise or graininess in your photo.
With a few simple adjustments, you can transform your pet photos from good to great.
| Key Point | Brief Description |
|---|---|
| 💡 Cost-Effective | DIY studio saves money compared to professional photoshoots. |
| 🐾 Pet Comfort | Home environment reduces pet anxiety for natural photos. |
| 📸 Lighting | Use natural or DIY diffused lighting for best results. |
| 🧸 Props & Toys | Use pet’s favorite items to keep them engaged. |
Frequently Asked Questions
You’ll typically need a backdrop (sheet, foam board), lighting (natural or clamp lights), and props (toys, treats). These materials are readily available and can be sourced within a budget of $50.
Create a positive and relaxed environment by keeping sessions short, using treats, and providing plenty of praise. Avoid any stressful situations to keep your pet comfortable.
Natural light is ideal, especially during golden hour. If using artificial light, diffuse it with a softbox or white sheet to soften shadows and avoid harshness on your pet.
A plain, neutral background like a white sheet or foam board works best. This keeps the focus on your pet and avoids distractions. Ensure the backdrop is smooth and wrinkle-free.
Adjust exposure, contrast, and white balance to correct any lighting or color issues. Sharpen the image to bring out details and reduce noise. Simple edits can greatly improve your photos.
Conclusion
Building a DIY pet photography studio: build a professional-looking setup for under $50 is a fun and rewarding project that allows you to capture beautiful and lasting memories of your beloved pets. With a few inexpensive materials, some creativity, and a little patience, you can create stunning photos that you’ll cherish for years to come.


